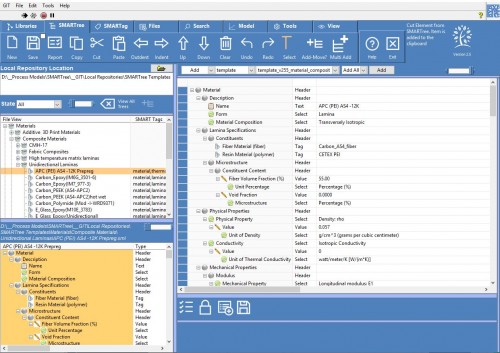
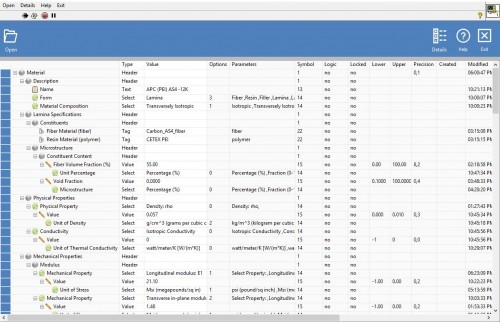
A SMARTree is a simple tree structure comprised of elements. These elements can be text, values, time, selections, tables, images, data and documents. There is no limitation on how the ‘SMARTrees’ are built and ordered. Many different content types can be added directly to the tree. These include text files, csv or tab delimited data, image files that include tiff, and jpeg as well as pdf documents. The data imported into the software is linked to user documents keeping the database size to a minimum. The environment is written so that users can build templates or ‘libraries’ to meet their requirements. SMARTrees also include SMART Tags that reference available trees to the SMARTree client. All files generated within this environment are loaded and saved *.xml format, which allows third party software easy access to information generated by this environment.
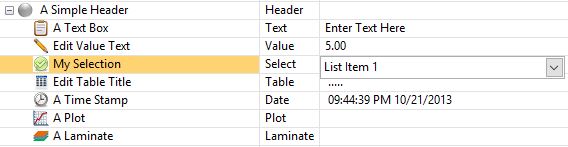
The basic elements a user can create are as follow:
- Header – A description of a tree section
- Text: A simple block of editable text
- Values: A user input for entering a numeric value
- Date: A user input for entering a date
- Selection: An editable dropdown selection
- Table: simple table of string or numeric data
- Laminate: A composite laminate comprised of layers of material
- Plot: A plot output from a model or data.
Shown above is a simple SMARTree that displays a number of these elements arranged in a user defined hierarchy. The second column describes the type of element in each row. The tree hierarchy is used to arrange the contents of your elements in a logical manner so that the relationships between elements is easily understood. It also allows the user to establish logic in the tree that can be used to pass conditions or states from “child” elements to their respective parents elements. This is especially useful when developing standards or protocols for your trees.
The elements can be organized in a hierarchical way using a number of methods that include drag and drop, using the “Edit” Tab, or right clicking the elements and using the shortcut menu to indent or outdent the elements.
There are a number of methods available to aid in creating elements for your tree. They include: right click and select “add item”, drag an item from a library, use the “add Item” button or through the use of preexisting templates. You can also use macros to create and edit elements efficiently.